Architecture Overview
Talos OS
Key Characteristics
Key talosctl Commands for Cluster Configuration
Proxmox
Key Concepts for Our Setup
Creating a Proxmox User for Terraform
Cloud-Init: Automated VM Configuration
How It Works
What’s Next
Whether you’re building a small in-house lab cluster or deploying a production-ready Kubernetes environment, this multi-part series will guide you through the complete deployment process. In this article, we’ll cover the theory and foundational concepts behind our setup. You’ll get an overview of the cluster architecture, the key technologies we’re using, and why we chose them. By the end of this first blog, you’ll have a solid understanding of how these pieces fit together to form a scalable and maintainable Kubernetes cluster foundation. We’ll start with an overview of the proposed cluster architecture, then take a closer look at each core component:
Then in the following article we will foucs on infrastructure automation and cluster bootstrap, make sure to stay tuned so you don’t miss it.
The cluster will consist of five nodes plus an additional virtual machine that serves as the management node. It includes three control plane nodes and two worker nodes, though the process described here can easily scale to larger deployments.
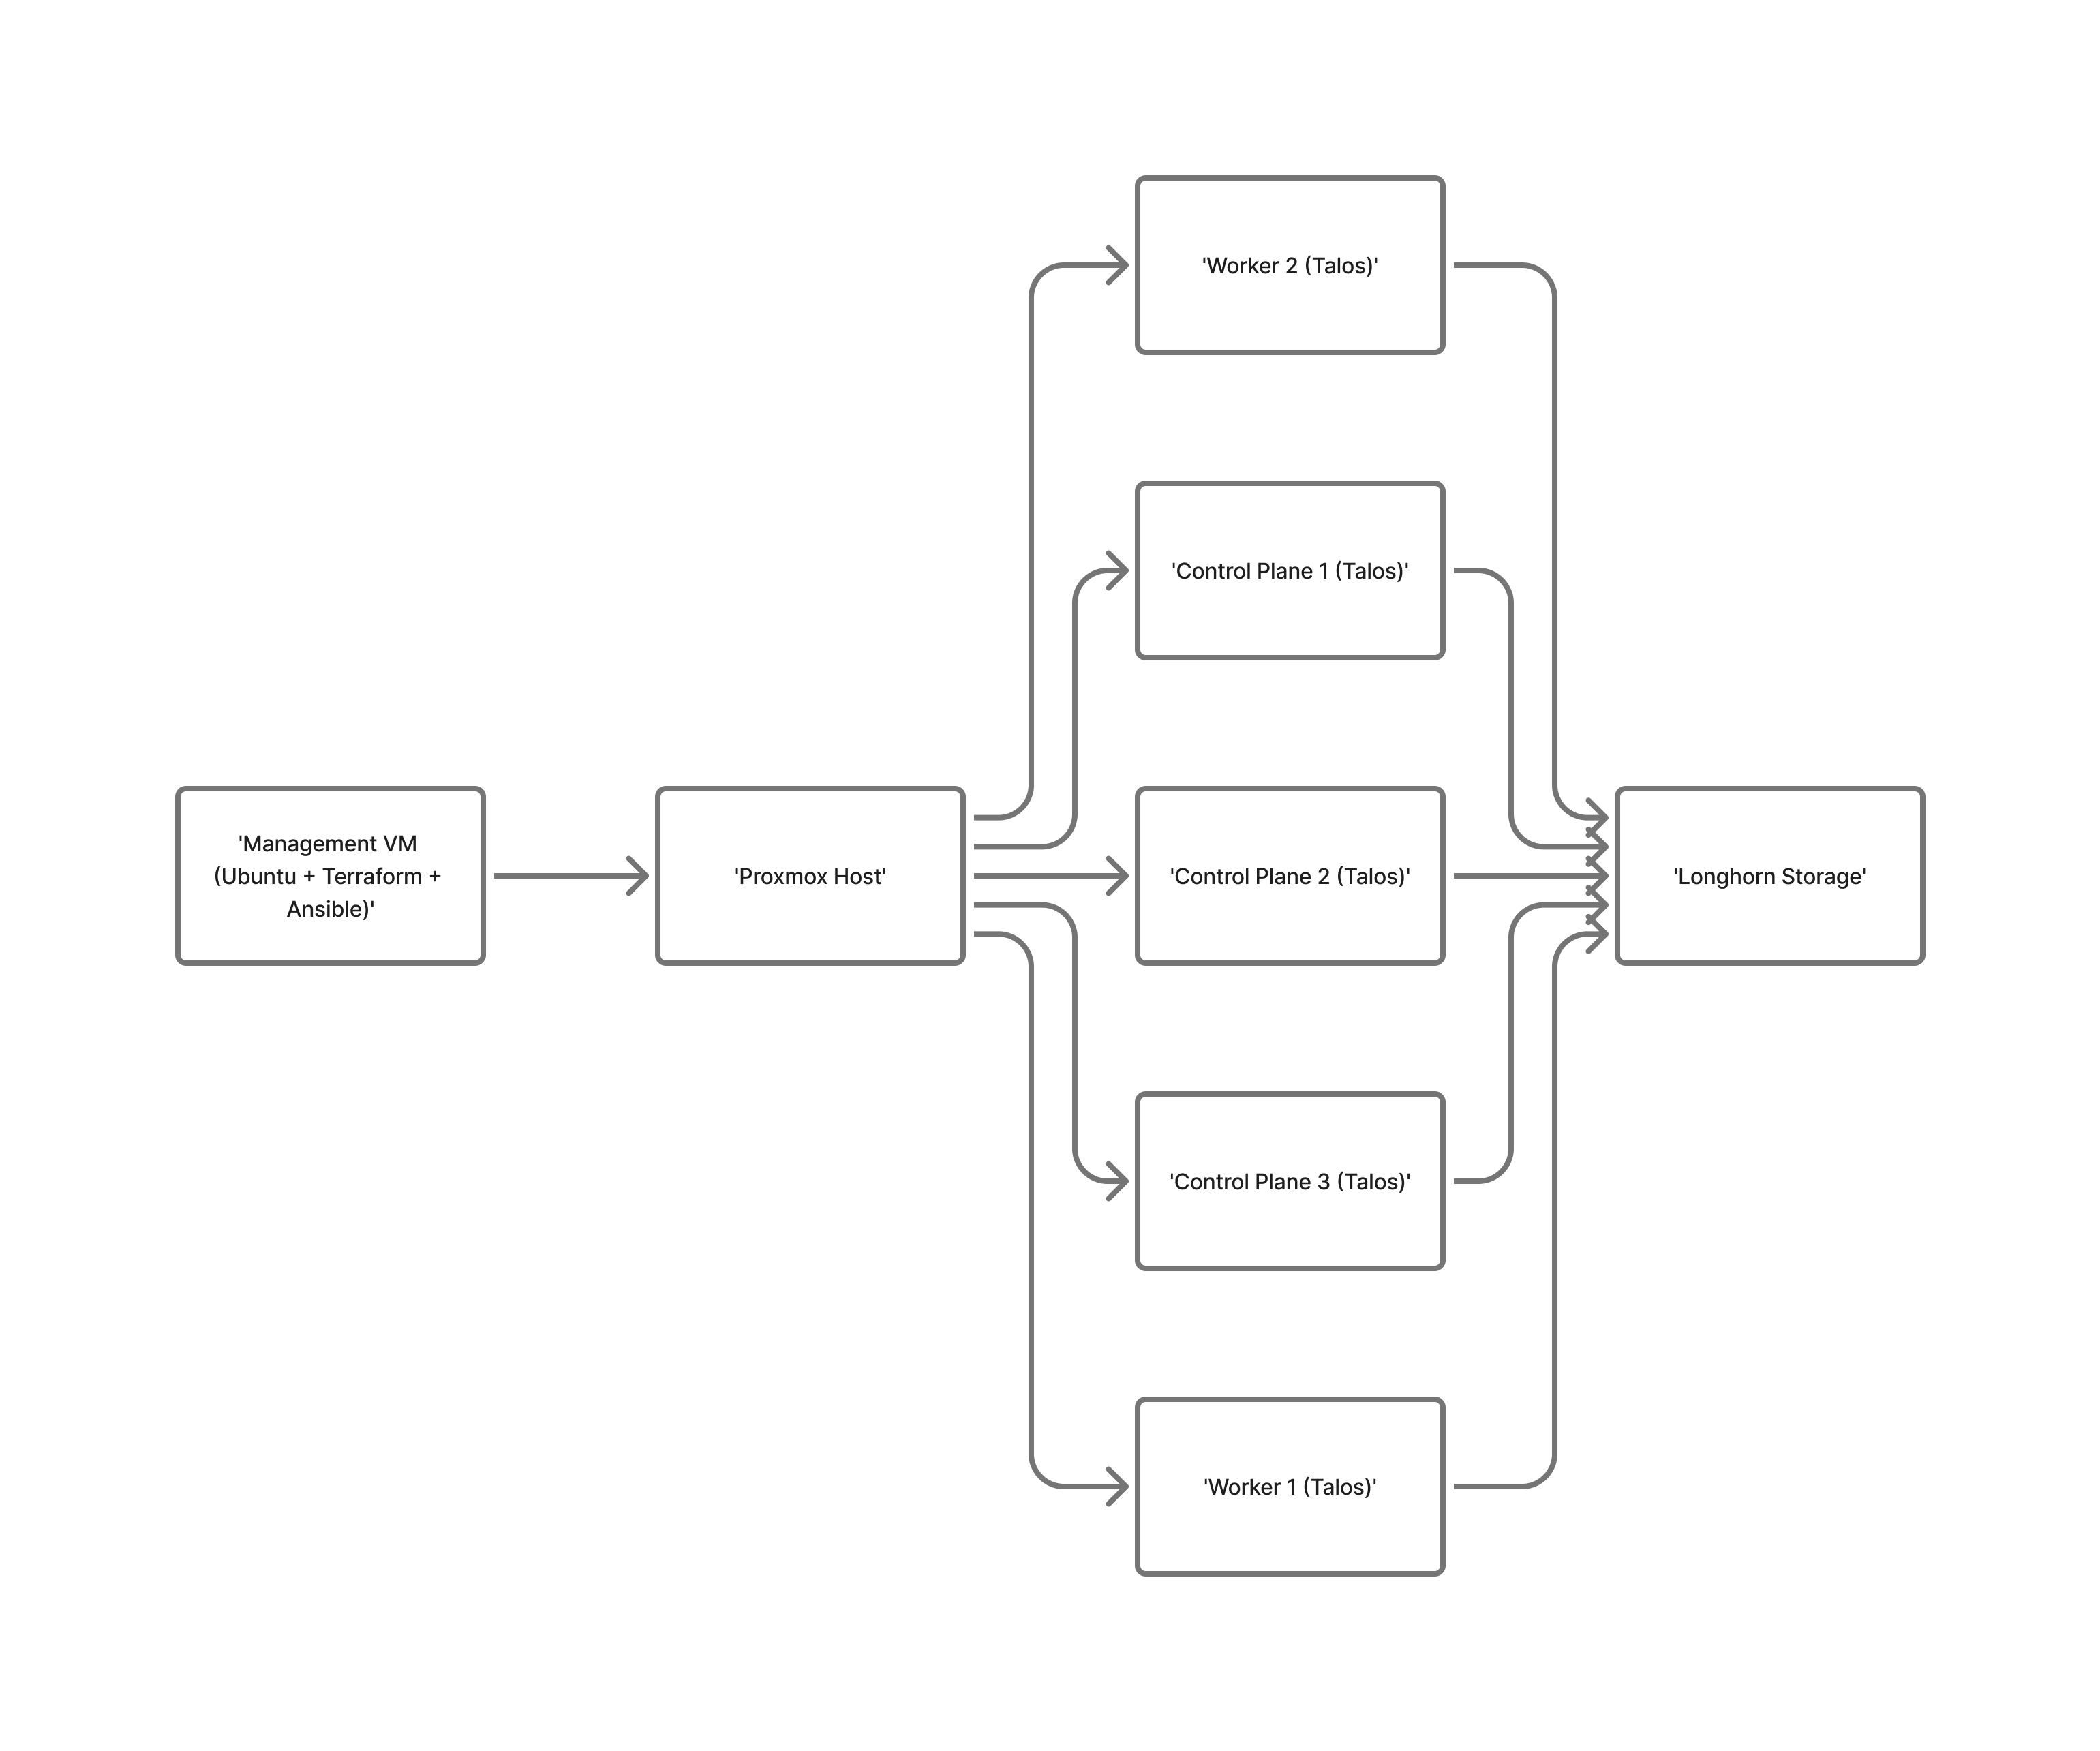
We chose three control plane nodes because that is the minimum recommended configuration for high availability (an odd number helps prevent split-brain scenarios). As for the worker nodes, we’re starting with two, which are sufficient for our needs. Worker nodes are typically easier to scale, so it’s best to start small and expand as required, this becomes especially important when running on cloud, where every resource has a cost.
Talos Linux represents a fundamental shift in how we approach Kubernetes node operating systems. Unlike traditional Linux distributions designed for general-purpose workloads, Talos was built from the ground up specifically for running Kubernetes. As a result, it excels in this environment and becomes relatively straightforward to configure once you understand its key characteristics.
One of its defining characteristics is that Talos does not allow SSH access. Instead, all operations are performed through a secure gRPC API using the talosctl command-line tool.
This approach eliminates the need for managing SSH keys or auditing shell access, and instead relies on authenticated API calls with built-in role-based access control (RBAC) for cluster operations.
Talos also embodies the principle of immutable infrastructure. The filesystem is read-only except for specific data directories, and the system is packaged as a single binary containing the kernel, system services, and Kubernetes components. This design greatly reduces configuration drift and attack surface but introduces the need for additional configuration to properly handle storage. In our case, Talos will be configured to support Longhorn as the storage solution, a process we’ll cover in detail later.
Naturally, there are trade-offs to consider. The learning curve is steeper when first implementing Talos, and it may take several iterations to get everything right. The lack of shell access can make troubleshooting more challenging, and as a relatively new operating system, it may not yet match the maturity or ecosystem support of long-established Linux distributions. Additionally, because management is API-driven, you’ll often rely on complementary tools to handle cluster administration effectively.
In summary, Talos Linux offers a modern, security-focused, and automation-friendly approach to running Kubernetes clusters. While it requires a shift in mindset and tooling, its benefits make it a compelling choice for both lab environments and production-grade deployments.
talosctl Commands for Cluster ConfigurationHere’s a quick overview of the main talosctl commands we’ll use to configure and bootstrap our Kubernetes cluster.
talosctl gen configGenerates the Talos cluster configuration files, including the control plane and worker node definitions, as well as the Talos machine secrets. These YAML files serve as the blueprint for how each node in the cluster will be configured.
talosctl gen config mycluster https://<control_plane_ip>:6443talosctl machineconfig patchAllows you to modify the generated machine configuration before applying it to your nodes.
This is especially useful for customizing settings such as network interfaces, storage, or cluster-specific parameters.
talosctl machineconfig patch controlplane.yaml --patch @patch.yaml --output controlplane_patched.yamltalosctl apply-config --endpointsUsed to apply the Talos configuration file to one or more nodes. This step effectively “installs” Talos on each VM by pushing the relevant YAML configuration over the API.
talosctl apply-config --endpoints <node_ip> --nodes <node_ip> --file controlplane_patched.yamltalosctl bootstrap --endpointsAfter Talos is applied to all control plane nodes, this command initializes the Kubernetes control plane on the first node. It performs the etcd bootstrap and creates the Kubernetes API server, turning your Talos nodes into an operational cluster.
talosctl bootstrap --endpoints <control_plane_ip>talosctl --endpoints {{ vip_ip }} --nodes {{ vip_ip }} kubeconfig ./kubeconfigOnce the control plane is up, this command retrieves the Kubernetes kubeconfig file from the cluster, allowing you to manage it using kubectl. It points both --endpoints and --nodes to the control plane’s virtual IP (or a specific control plane node) and writes the configuration locally.
talosctl --endpoints <vip_ip> --nodes <vip_ip> kubeconfig ./kubeconfigProxmox Virtual Environment (PVE) is an open-source virtualization management platform that combines the KVM hypervisor and LXC containers under a single, web-based management interface. In our Talos deployment, Proxmox serves as the foundational virtualization layer, hosting all the virtual machines that make up the cluster.
Unlike VMware vSphere, Proxmox is completely free to use, with optional commercial support available. This makes it an excellent choice for homelab environments and cost-conscious production setups. Beyond affordability, it boasts an active community, comprehensive documentation, and a rich ecosystem of third-party tools. Having been actively developed since 2008, Proxmox is both mature and reliable.
VM Templates: We’ll create reusable templates for both Talos and Ubuntu virtual machines. These templates enable rapid deployment of consistent configurations across nodes.
Cloud-Init Integration: Proxmox has built-in support for cloud-init, which we’ll leverage to automatically configure our management VM with the necessary tools and user settings. We will cover cloud-init in the next section.
Networking: All VMs will connect to the default vmbr0 bridge, providing access to the physical network. Instead of using DHCP reservations, static IP assignment will be handled directly through the Talos configuration files.
User Permissions: A dedicated Proxmox user must be created with appropriate privileges for automation. In the Proxmox web interface, create a new user (e.g., terraform@pve) and assign roles that allow VM lifecycle management, storage operations, and API access. This user will be used by Terraform to programmatically manage VMs.
This setup provides the perfect balance between automation and flexibility allowing us to programmatically provision VMs using Terraform while retaining the ability to manage and monitor them through Proxmox’s intuitive web interface when necessary.
To enable Terraform to interact with your Proxmox environment, you’ll need to create a dedicated user account with API access. This can be done via the web interface or through the CLI, depending on your preference.
terraform@pve)./ so Terraform can manage VMs and storage.If you prefer automation, the same setup can be done using the Proxmox command line:
# Create a user
pveum user add terraform@pve --password 'your-strong-password'

# (Optional) Create an API token
pveum user token add terraform@pve terraform-token --comment "Token for Terraform automation"

# Assign permissions
pveum aclmod / -user terraform@pve -role PVEAdmin
For more restricted setups, you can create a custom Terraform role:
pveum roleadd TerraformRole -privs "VM.Allocate VM.Config.Disk VM.Config.CPU VM.Config.Memory VM.Config.Network VM.Console VM.Monitor Datastore.AllocateTemplate Datastore.AllocateSpace Pool.Allocate Sys.Audit"
pveum aclmod / -user terraform@pve -role TerraformRole
Once created, store your credentials or token securely, you’ll need them to configure the Terraform Proxmox provider.
Cloud-Init is a widely adopted industry standard for automating the initial configuration of cloud instances and virtual machines. It runs during a VM’s first boot and handles many of the tasks that would otherwise require manual setup or custom scripts.
Cloud-Init automates VM configuration through a straightforward, though often misunderstood, process. We start by creating a YAML configuration file (e.g., management-vm-cloud-init.yml) containing all our setup instructions. This file is then uploaded to the Proxmox server’s local storage directory at /var/lib/vz/snippets/. When Terraform provisions a new VM, it references this file using the following configuration: cicustom = “user=local:snippets/filename.yml”.
This directive tells Proxmox to create a virtual CD-ROM drive containing our Cloud-Init configuration. During the VM’s first boot, the Cloud-Init service automatically detects this virtual CD, reads the YAML file, and executes the defined instructions like installing packages, creating users, configuring networking, and running custom commands as specified.
This process eliminates the need for manual setup or complex post-deployment scripts, ensuring every VM starts from a consistent and predictable configuration. The key detail to understand is that the configuration file is never copied into the VM itself. Instead, Proxmox presents it as a virtual CD-ROM, which Cloud-Init reads once during the initial boot to complete the automated setup.
You’ve now built the foundation for deploying a Kubernetes cluster with Talos Linux and Proxmox understanding how each piece fits together and why these tools make such a strong combination. From Talos’s immutable, API-driven operating system to Proxmox’s versatile virtualization layer and Cloud-Init’s automation magic, you now have the theoretical building blocks to create a modern, maintainable Kubernetes setup.
In the following articl, we’ll move from theory to practice. We’ll use Terraform to automate VM provisioning, and apply Talos configurations to bootstrap the control plane. By the end of that next blog, you will have a 5 node working cluster.
Stay tuned.